Showing posts with label Lamps. Show all posts

Wednesday, May 11, 2011

How to Age Brass

Is it just me, or have you also noticed brass making a comeback lately in the design world?


Brass sink, faucet, and light fixture – photo source unknown

I am not talking about shiny lacquered brass but rather the aged, “been around for a while” looking brass.

Brass vase from Little Green Notebook

Having owned my share of brass fixtures, lamps and accessories, I will be the first to admit I go back and forth on my opinion about brass – sometimes I like it and sometimes I don’t and my feelings about it seem to change depending on the room in which it is being used. What I am quite certain about, however, is my dislike for shiny, lacquered brass – the type my table lamp (shown below) is made from.


To remedy the situation I decided to do some internet research to find out how I could age my brass lamp. The technique shown below can also be used for candlesticks, door knobs, etc. – the key is to make sure the item you are working with is brass.

Supplies
Nail polish remover
Apple cider vinegar
Final stripping pads
Paper towels
Towel

Directions
Take lamp apart.


Place a small amount of nail polish remover on stripping pad. Gently rub to remove lacquered finish. It is important to use a very fine grade of stripping pad so that you do not make scratches in the metal.


Once all lacquer has been removed, wipe brass with soap and water to remove any nail polish residue. Dry.


Place lamp on towel and slowly pour a small amount of apple cider vinegar over the brass. You may want to place a piece of plastic under the towel to prevent the vinegar from soaking into the table or floor surface. If you are using a candle stick or something similar you could soak the item in a container rather than use the method shown here.


Let sit and add additional apple cider vinegar until desired finish is achieved. I discovered the brass which was in contact with the soaked towel aged fairly quickly. Thus, I kept turning the sections of the brass which had not aged so that they were in contact with the soaked part of the towel.


If your brass turns green – like mine did – simply wipe clean with a damp cloth.


The result – a lamp which now looks like it has been around for many years.


I would love to hear your opinion about brass.  Do you have any brass in your home? If so, where?  Thanks for sharing your ideas and thoughts!

Linking up with
Metamorphosis Monday at Between Naps on the Porch
Transformation Thursday at The Shabby Chic Cottage
Tip Me Tuesday at Tip Junkie
Tickled Pink at 504 Main
Saturday Night Special at Funky Junk Interiors

Thursday, April 7, 2011

A Blue Glass Lamp

Not too long ago I shared my lamp moving adventure – a small project which morphed into an entire day of rearranging! At the end of this story I was left with one side table in our guest bedroom in need of a lamp. With lots of family coming to visit soon, finding something to fill this space became a priority.


I looked in all the normal places but just did not find anything (which was not expensive) that would work. I had all but given up when I happen to come across a pretty blue glass lamp while checking out a Craig’s list item (more on what this was later).


What caught my eye were the size of the lamp (almost 36 inches tall), the round silk shade, and the blue glass globe. I was not sure about the brass but figured I could always change it with some paint later. The lamp was part of a set found at an estate sale but unfortunately the other lamp’s globe was cracked along the bottom and the shade was stained. I ended up buying the one lamp and other item for the price of the other item – a free lamp!

As I mentioned above, I originally planned to use this lamp in the guest bedroom. However, once I brought it home I realized it just did not work with the green/blue cart I have for the bedside table. So I did some more lamp rearranging and brought back the original white ceramic lamp to the guest bedroom.


The blue glass lamp is now right at home in the master bedroom.


To bring blue to another part of this neutral space I added a silk pillow which I already had (still another story!) to the bed.


I think this little touch of blue is just what this room needed.


I am even growing to like the brass. Don’t tell Mr. RDH though because he finds it hard to understand why I like a brass lamp and don’t like the brass ceiling fan in the same room!

Linking to:
Between Naps on the Porch Met Monday


Thursday, February 24, 2011

The Snowball Effect

For some reason I have been struggling with how to decorate my new-to-me buffet – nothing I tried seemed to work. (Maybe the empty space above the buffet - which is supposed to be filled with my yet to arrive mirror – is the real problem.)

Anyway, I came across the picture below which I had saved to my favorites file.

Image via Cote de Texas

I noticed the two alabaster lamps and immediately knew I had found at least part of my decorating solution. You see I already owned a pair of similar lamps which were currently residing on my bedroom dresser.

So I did a test run and moved the pair to the buffet - loved it!


This left the dresser empty.

I liked having a matching set of lamps on the long dresser and decided to regroup the pair of painted brass lamps I had separated to two different bedside tables.


Now that my dresser was once again complete I was left with two empty bedside tables – one in my daughter’s bedroom and one in the master bedroom.

A trip to Target and my daughter’s empty beside table was filled.

BEFORE

AFTER

A trip to the basement guest room and my bedside table was looking good again.

BEFORE

AFTER

Needless to say, what started as a simple desire to accessorize a buffet snowballed into a few hours of lamp rearranging. Fun, but definitely more time consuming than what I had in mind when I started.

I am happy with the result but still need one more lamp for the guest bedroom.


I was curious to know if you have ever done this – moved or added one thing only to spend the day moving things from here to there. I am guessing we all have a similar story to tell. I would love to hear yours!

Saturday, May 15, 2010

Final Bedroom Reveal

For the past few weeks I have been showing various parts of my daughter’s bedroom makeover. I so appreciate everyone who has followed along and shared such encouraging comments. Thank you! So, without further delay, here is the room in its entirety.
Where we began
As I have mentioned before, my daughter’s room was decorated around a blue and green Laura Ashley bedding set I used when I was in college.
I made the curtains from an extra set of sheets. The dressing table was a roadside find which I panted and stenciled. You can tell from the before photos, I was very much into everything matching perfectly. I have since come to realize by mixing things up a bit, a room becomes more interesting.
Putting it all together
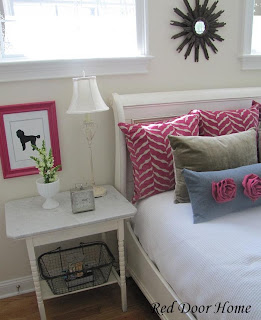
Although my daughter has not reached double digits, she wanted a room where she could make some of the decorating choices. We were not initially on the same page, but through compromise – she wanted pink and dogs and I wanted a space that would fit in with the rest of the house and one she would not out grow in a few years - we were able to create a room we both love. The starting point for the entire project was the curtain fabric.
I have to admit it was a real struggle to find coordinating fabric to use for the Euro shams. After many hours online, I finally found the pink zebra fabric. (I apologize for not remembering the source.) The regular shams are made from left over fabric from another project and the long pillow with the flowers I made from inexpensive suiting material.
The bedside table is topped with a piece of marble I purchased at an antiques store. I love how the gray veining picks up the other gray features in the room and adds another layer of texture to the space. (To see the story behind the marble click here.) The lamp is one of a pair which I painted and glazed.
For artwork, I created inexpensive dog silhouettes, . . .
. . . updated a bulletin board with ribbon . . .
. . . and added a simple frame around the chandelier.
The dressing table was updated with a fresh coat of paint . . .
. . . and accessorized with vintage and yard sale finds.

Unplanned Changes
One of the biggest changes in this room was the flooring. You may have noticed from the before picture, the bedroom was carpeted. Installing hardwood floors was not in the original redo plan. In fact, the room was basically finished when we decided to replace the carpeting. We were at the point where something had to be done - markers, nail polish and lotion just do not work well with white carpet.
Replacing the carpeting with wood floors meant purchasing a rug. After what seemed like endless searching for the right color and size, I finally splurged on the pink and white rug you see above – the finishing touch to the room.

So there you have it – my daughter’s room redo! It is hard to believe the entire process started over 8 months ago. Overall, I think we achieved the goals of this project. I am very pleased with the results and most importantly, so is my daughter.

Sources:Bed – Ethan Allen
Dresser – Ethan Allen
Rug – Madeline Weinrib
Dresser lamp – vintage yard sale find
Bedside lamp – repainted brass lamp
Curtain fabric – Calico Corners
Pillow fabric (gray and pink) – JoAnn Fabrics
Pillow fabric (tan velvet) – Calico Corners
White faux fur throw – Home Goods
Sunburst mirror – Wisteria
Upholstered cubes – Target
Upholstered cube slipcover fabric – fabric JoAnn Fabrics
Bulletin Board – Ballard Design
Small Shelf below bulletin board - Target

Linking up to some of my favorite parties.

Sunday, March 7, 2010

Bye Bye Brass!

This pair of brass lamps has been waiting patiently for several months for a makeover. With the weather cooperating this weekend, I finally got the chance to paint!
My list of supplies was short – spray paint, glaze, newspaper, sanding block, cardboard, paper towels, and painting tape. I decided to go with white instead of using the more popular oiled rub bronze (ORB) finish I have been seeing everywhere.
 
Lamps ready to be painted – lightly sanded and everything that should not be painted covered.
My painting studio – snow still on the ground but at least the sun was shining!
To paint the finials, I put a long nail in the cardboard and then placed the finial on top.  This allowed me to paint the entire finial including the bottom.
Here is a close up view of the lamps after they were glazed. I simply applied the glaze using a paper towel, adding layers until I achieved the desired finish.

Now for some lamp shade choices.

Option number 1
Here is what one lamp looks like - painted and with the original shade. Very pretty!

Option number 2
Then I started thinking. After putting the original shades back on the lamps I was not sure if they were "too white." I wanted to add some texture to the shades but not spend any additional money. My solution - a simple burlap lamp shade slip cover. (directions on how to make this are below)


So, which shade do you like better? As I plan on using both lamps in this space, I would love to hear your opinion! Either way, I am very pleased with the outcome of this simple project.

Lamp Shade Slipcover Tutorial
Materials:  Burlap, Coordinating thread, ¼”Ribbon, Safety Pin

Measure height and bottom circumference of lamp shade. Add 5” to the circumference measurement and 2” to the height measurement.

Use a finished edge of the burlap as the bottom edge of your piece of fabric. Cut piece of burlap according to above measurements. To help prevent fraying, sew 1/4” seam allowance along three unfinished sides.

Press side seams under ½” with iron and sew using a ¼” seam allowance. Press top seam under 1 ¼” with iron and sew 1” down from folded edge. This will form a pocket.

Cut piece of ribbon a few inches longer than fabric. Attach safety pin to one end of ribbon and pull gently through pocket. Slightly gather top by pulling ribbon ends.

Align gathered top with top of lampshade. Pull ribbons tight, adjusting gathers so they are evenly distributed around entire slip cover. Tie ribbon in bow.

The DIY Show Off

     Sumo Sweet Stuff
     

   DIY Day @ ASPTL


http://www.thethriftyhome.com


Blog Widget by LinkWithin