Showing posts with label Silhouettes. Show all posts

Tuesday, September 13, 2011

Goodies in the Mail and a New Family Addition

The past few weeks have been filled with lots of fun and excitement!  The mailman has been a regular visitor at my house – delivering a few expected packages as well as a nice surprise – and we have added a new member to the family.

Last week started off with the delivery of this wonderful enamel sign I won a while back from a giveaway hosted by Darlene at Fieldstone Hill.


It is made by Ramsign and is a work of art which is made to be used.  It took several weeks to arrive once my order was placed but it was well worth the wait.  Thanks Darlene!

The second delivery came about courtesy of Joan from For the Love of a House.  She recently shared her source for real wax candle sleeve covers - Lumiere Candles.  I honestly did not even know such a thing existed!
Since I am all about the details, I couldn’t wait to replace the plastic sleeves on my vintage light fixtures in the dining room and living room with the real thing.


The funny thing was, I was in such a rush to order the candle sleeves I ordered six twelve inch sleeves instead of the twelve six inch sleeve I needed.  Lucky for me, Lumiere Candles’ customer service is incredible.  I left a message about my mistake and received a phone call back almost immediately telling me what I need to do to make an exchange.

My new beeswax candle sleeve covers really do make a difference in the way the chandeliers look and I highly recommend them for anyone who loves authenticity.
The third package I received this past week was a lovely surprise.  I recently featured Jenni from Dear Lillie as the September RDH blog of the month.  During the post I mentioned how much I liked the silhouette shopping bag which was a new addition to the Dear Lillie Store.  Well, a few days later I received one in the mail!  It was such a lovely and unexpected gesture and I can’t thank Jenni enough.


Finally, I wanted to share a picture of the newest addition to our house with the red door – Abby!

She is a miniature Schnauzer puppy and came to live with us just this past Saturday.  She may show up from time to time in some upcoming pictures so I thought I should introduce her to you.

Saturday, May 15, 2010

Final Bedroom Reveal

For the past few weeks I have been showing various parts of my daughter’s bedroom makeover. I so appreciate everyone who has followed along and shared such encouraging comments. Thank you! So, without further delay, here is the room in its entirety.
Where we began
As I have mentioned before, my daughter’s room was decorated around a blue and green Laura Ashley bedding set I used when I was in college.
I made the curtains from an extra set of sheets. The dressing table was a roadside find which I panted and stenciled. You can tell from the before photos, I was very much into everything matching perfectly. I have since come to realize by mixing things up a bit, a room becomes more interesting.
Putting it all together
Although my daughter has not reached double digits, she wanted a room where she could make some of the decorating choices. We were not initially on the same page, but through compromise – she wanted pink and dogs and I wanted a space that would fit in with the rest of the house and one she would not out grow in a few years - we were able to create a room we both love. The starting point for the entire project was the curtain fabric.
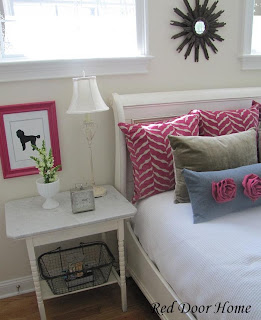
I have to admit it was a real struggle to find coordinating fabric to use for the Euro shams. After many hours online, I finally found the pink zebra fabric. (I apologize for not remembering the source.) The regular shams are made from left over fabric from another project and the long pillow with the flowers I made from inexpensive suiting material.
The bedside table is topped with a piece of marble I purchased at an antiques store. I love how the gray veining picks up the other gray features in the room and adds another layer of texture to the space. (To see the story behind the marble click here.) The lamp is one of a pair which I painted and glazed.
For artwork, I created inexpensive dog silhouettes, . . .
. . . updated a bulletin board with ribbon . . .
. . . and added a simple frame around the chandelier.
The dressing table was updated with a fresh coat of paint . . .
. . . and accessorized with vintage and yard sale finds.

Unplanned Changes
One of the biggest changes in this room was the flooring. You may have noticed from the before picture, the bedroom was carpeted. Installing hardwood floors was not in the original redo plan. In fact, the room was basically finished when we decided to replace the carpeting. We were at the point where something had to be done - markers, nail polish and lotion just do not work well with white carpet.
Replacing the carpeting with wood floors meant purchasing a rug. After what seemed like endless searching for the right color and size, I finally splurged on the pink and white rug you see above – the finishing touch to the room.

So there you have it – my daughter’s room redo! It is hard to believe the entire process started over 8 months ago. Overall, I think we achieved the goals of this project. I am very pleased with the results and most importantly, so is my daughter.

Sources:Bed – Ethan Allen
Dresser – Ethan Allen
Rug – Madeline Weinrib
Dresser lamp – vintage yard sale find
Bedside lamp – repainted brass lamp
Curtain fabric – Calico Corners
Pillow fabric (gray and pink) – JoAnn Fabrics
Pillow fabric (tan velvet) – Calico Corners
White faux fur throw – Home Goods
Sunburst mirror – Wisteria
Upholstered cubes – Target
Upholstered cube slipcover fabric – fabric JoAnn Fabrics
Bulletin Board – Ballard Design
Small Shelf below bulletin board - Target

Linking up to some of my favorite parties.

Sunday, May 9, 2010

Bedroom Makeover Part 3 – Dog Silhouettes

The third part of my daughter’s bedroom makeover features a simple DIY project – dog silhouettes. Silhouettes in various forms have been shown numerous times all across the blogging world for three simple reasons – they are inexpensive, easy to make, and look great with almost any decor.
Besides keeping costs down, another goal of this project was to include my daughter’s ideas in the design of the space. She was the client and my job was to make a room she liked. She had two specifications - pink and dogs. Knowing a themed space would grow tiresome quickly and not wanting to venture into the “pink puppy” world, the silhouettes were a great compromise.

What I did:
The first step in this project was painting the picture frames pink. My initial attempt didn’t work out quite right – the paint looked too neon. I adjusted to color by adding some brown to tone the pink down to the right color.
After painting and sealing the frames, the next step was creating the silhouettes. I searched the internet for pictures of dogs which would have recognizable outlines. This process was a great way to involve my daughter as she told me what types of dogs she liked. We selected and printed out four pictures.
After cutting out the images, we used a white crayon to trace the outlines of the dogs onto black cardstock.
The images were cut and glued onto white paper. (It is hard to tell from the pictures but the white paper has tiny ridges for added texture.)
We assembled the frames and hung the pictures. Simple, quick and easy!
Supplies:
The four frames and supplies were purchased at AC Moore for less than $60.
Picture frames
Paint
Black paper
Scissors
Glue
White paper
White crayon

In case you missed it, here are some previous posts highlighting other projects in my daughter’s bedroom redo:
Dressing table redo
Bulletin board project
Marble top night stand
Ceiling embellishment

Linking up to some of these parties
Blog Widget by LinkWithin