Showing posts with label Painting. Show all posts

Tuesday, September 25, 2012

Refinished Coffee Table – the details!


A little while back I shared a sneak peak of a coffee table project I was about to begin using a new-to-me refinishing technique.  I am happy to report it is complete and turned out even better than I had hoped!


Above is what the table looks like today and below is a picture of what the table looked like when I started.  I loved the shape and scale of the table for our office sitting area but it was very orange and too shiny. 


My original refinishing plan was to use a furniture stripper followed by sanding with a palm sander.  My plans changed, however, when I visited my local Lowes store.  The salesperson I worked with just happened to be a woodworker and suggested I try using acetone for removing the finish, followed by a good hand sanding.  The acetone, he said, would remove all the inorganic elements (stain and varnish) from the wood and by using a 00 grade of steel wool the table would require only hand sanding to achieve a perfectly smooth finish.   It sounded pretty simple so I decided to give it a try.

After he explained the safety considerations when working with acetone – it will burn your skin and eyes and is highly flammable and should only be used in well ventilated (outside) areas away from any open flames – we went around the store gathering up the supplies.  I needed acetone, chemical safe gloves, a full chemical face mask, 00 grade steel wool, fine grit sand paper and a small metal bucket.

I began the project by removing the brass casters and decorations from the table. The table was then placed outside on rocks (acetone will kill grass) in the corner of our garden area on top of a layer of plastic and newspapers.  I tied my hair back, wore long pants, a long sleeved shirt tucked into the chemical safe gloves and the face mask to make sure I was fully protected.


Once I was ready to go, the project was fairly straight forward.  Simply pour about an inch or two of acetone in the metal bucket, dip the steel wool into the acetone and then start scrubbing with the grain of the wood.  (Acetone will evaporate quickly so you only want to pour a small amount in the bucket at a time.)  Keep dipping the steel wool into the acetone and scrubbing.  When the steel wool “wears out” grab a new piece and repeat the procedure until you are satisfied with the results. 

After all the finish was removed, I sprayed the table with water using a garden hose and let it dry outside.  When the table was completely dry it was time for a hand sanding to even out the grain of the wood and remove any residue. 

It took about 3 hours for me to remove everything from the wood using the acetone and steel wool plus more time for sanding. It was a lot of work but the results were worth the effort.  The table was returned to the natural wood color and was extremely smooth.


Since I wanted the table to have a light, slightly white finish, I decided to try another first for me - Briwax liming wax.  I could not find it locally so I ended up ordering the wax online.  I simply followed the directions on the can and applied small amounts using a cotton cloth.  I kept applying the wax until I had the look I wanted.  Once the wax was dry it was time for a top coat of furniture wax.  I used a clear finish furniture paste wax by Minwax. 


The table turned out wonderful!  I also have to say liming wax has now been added to my list of favorite products.  I have already used it on another project which I will be sharing shortly and have found myself looking around my house to see what other wood pieces I can use it on!

I am curious to know, have you ever tried using acetone and/or liming wax?  Were you happy with the results?  Looking forward to hearing about your experiences!

Note:  Please be sure to read all the instructions and warnings on the acetone container and wax as well as consulting with a salesperson to make sure you have all the proper equipment to order complete this project safely.


Wednesday, February 15, 2012

Dining Room Redo – The Details


Thank you all for the nice comments about my dining room.  I have to say this was the first time I have ever been apprehensive about a blog post.  I truly was nervous!  So many of you loved the chairs next to the buffet in their original orange velvet, I was not sure what the reaction was going to be when I revealed I had recovered them in gray.  So needless to say I am thrilled so many of you left such encouraging and wonderful comments.  Now on to the details!


If you have been a long time follower, you probably know this room is a collection of furnishings which has evolved over time.  The buffet and six chairs (which I painted white and recovered in blue velvet for this redo) where bought from the Salvation Army.  Along with a table which is now in the basement, I paid $150 for all 9 pieces. The large cabinet is an antique store find. It is made of two pieces and I was told it was taken from a local real estate office.  I could not believe my luck when I found it a couple of years ago as it is the perfect fit for the wall on which it resides.


The table is made by Henredon and is a Craigslist purchase.  The chairs which matched this table are now around the kitchen table.  I used a vintage grainsack with blue stripes for a runner to add more texture to the room as well as lighten up the table. An ivy topiary from Lowes adds a much needed bit of green.


The mirror above the buffet is by Uttermost and the pair of alabaster lamps is an Ebay purchase.  Above the duo of vintage 1950’s chairs hang a pair of paintings by Jennifer Lanne.  Jennifer’s work has been featured in Country Living magazine as well as several other publications.  I have several of her paintings scattered about my house, as she is a favorite local artist of mine.


While most of the items in the room are older, there are a few newer pieces as well.  The rug is by Madeline Weinrib and the gray silk curtains I made from fabric purchased at Calico Corners.  The clock between the windows is new but is a bargain floor model from Ethan Allen which I painted.


Finally there is the pair of now gray French chairs with the ikat pillows which I made by repurposing the old fabric on the dining room chairs. In regards to my decision to recover the chairs, in the end it just came down to the fact that the orange was just not me.   It truly was a struggle to decide what to do – leave them alone or recover – but in the end I am so happy with how the room looks now so it was the right choice for me.


Thanks for following this transformation.  I would like to say this room is finished but as you know I have a hard time leaving things alone.  I am sure a little while from now I will be adding or replacing something. For now, however, I am just going to enjoy the room the way it is!

Thursday, September 29, 2011

New to Me Hallway Mirror

Thank you so very much for all the nice comments about our new puppy, Abby.  She has been such a delight and has already become an important part of our family.  It is hard for me to believe over two weeks have passed since I last shared news from the house with the red door.  I don’t think I have ever gone this long without posting something since I started this blog over two years ago.  It is not for lack of things to write about but rather just plain busyness.

Anyway, I wanted to finally reveal what I meant to buy when I purchased the blue glass lamp for the master bedroom way back in April.  You may recall I had come across an item of interest on Craig’s List and ended up purchasing the lamp and the item.  What was the item?


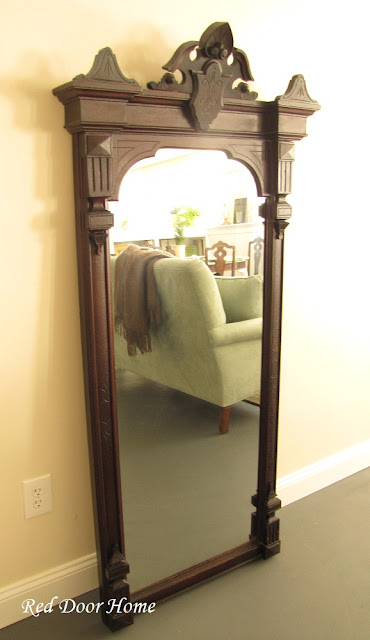
It was a large Eastlake mirror.


Originally I was looking for something big to fill up the wall space at the bottom of the basement stairs (from the above pictures you can tell it did not end up there) and thought a large mirror would be just the thing. I have always loved the look of an oversized mirror leaning against the wall and this seemed like the perfect spot.


After a while, however, I realized it was just not big enough for the space.  It looked good but didn’t have the impact I had wanted.  I began looking for an alternative location and was so pleased to see it fit perfectly at the entrance to the basement stairwell.


No surprise in that I decided to paint it white – Annie Sloan’s old white to be exact.  I still have not figured out if I should distress the edges or leave it as is.  I keep waffling between the two.  I would love to know what you think!


Thanks again for your patience!  I am going to try to get caught up soon.


Thursday, August 11, 2011

When Painting is not an Option


Whether you are a long time follower or new to Red Door Home, you have most likely figured out I am not shy when it comes to wielding a can of spray paint.  I have painted lamps, tables, chairs, mirrors, stools, light fixtures and much more.


So it may come as a little bit of a surprise to know there are times when I believe painting is not always the best answer to making over a piece of furniture.  Case in point is the display cabinet shown below in my kitchen.

Womens Day Budget Decorating – Photographer,  Michael Partenio
Stylist – Donna Talley, Regional Producer and Editor for Meredith Publications

 While I love the lines of the cabinet, I could do without the large expanse of oak wood.  (You may have noticed a theme here in my kitchen eating area.)  Since painting is not an option, several ideas on how to “fix” this cabinet have come to mind.
via Restoration Hardware
I thought about sanding and waxing the wood – similar to the Restoration Hardware furniture shown above.  A second idea which I playerd around with - and just did not work - was adding fabric or paper to the back of the cabinet like the photo shown below.
via Martha Stewart
In the end, however, the best option for me was simply to change out the contents of the cabinet.


By relocating my blue and white transferware to the dining room and replacing it with my collection of white ironstone mixed with a few pieces of silver and mercury glass, the cabinet immediately felt lighter and brighter.

Big changes without any expense – the best kind of makeover!


Friday, August 5, 2011

Completed Projects Sneak Peek

It seems whenever I return home from a vacation I suddenly am re-energized and ready to tackle all the projects I have had on my mind but have yet to complete.  I usually make a list while riding in the car on my return trip home and then once back, I go, go, go until most of the items are done.  (Does anybody else do this?)

Unfortunately, however, while I have been very busy getting lots of things accomplished, I have not been quite as diligent about writing posts about them.  So my plan this weekend is to get caught up on all the details of what I have been up to lately.

In the meantime, here is a little sneak peek of what I have been working on.


Look for all these projects and more soon!

Sunday, June 5, 2011

Chalk Paint Table and Chalk Paint Observations


My second project using chalk paint involved a roadside freebie table (shown below) from the master bathroom.


This table was a perfect candidate for chalk paint as I did not want to spend a lot of time removing all the old paint – at least four coats - and sanding. Although not required, you can tell from the picture I did give the piece a light sanding to smooth out the surface a bit. I also scraped off much of the paint from the top as it was chipping. I used Annie Sloan’s Paris Grey (the same color I used on my mirror) with a top coat of Minwax for light colored wood.


One coat easily covered the old paint and the wax deepened the color - giving the table a beautiful, hand rubbed finish. If you look carefully at the picture above you can see the difference in color between the left side of the table which was waxed and the right side which was not.


This is certainly a big improvement from the formerly high gloss black paint this table used to wear.

Chalk Paint Observations
Now that I have completed two projects using chalk paint I have to say I am definitely a fan. It is easy to apply and most, if not all, the brush strokes disappear once the paint has dried. I know many people find the cost to be high. My take is that because there is no need to sand or prime you save not only in supply costs but time as well - time being the biggest bonus in my mind.


This paint covers well in just one coat, however, I did notice the mirror and table turned out to be slightly different colors. I am guessing this is due to the color paint I was covering. I am thinking two coats might be needed to achieve a more consistent color.

If you have any questions about using chalk paint I highly recommend this post written by Shauna at Perfectly Imperfect Blog. Shauna is a pro at painting and shares a great video and advice on her experiences using chalk paint.

Oh! For those of you who are curious, yesterday, I finally told my husband I painted the mirror in the kitchen. The verdict – he loved it but he liked the mirror the other way as well.

So, have you tried chalk paint yet? If so I would love to know your opinion!

Linking up to these parties
Metamorphosis Monday
Transformation Thursday
Open House Thursday


Friday, May 20, 2011

Painting on a Whim


For some reason, yesterday I decided the mirror over the grain bin in the sitting area of my kitchen needed to be painted. I am not exactly sure why, as it has never been an issue before and to tell the truth I am usually not impulsive when it comes to decorating decisions.

I just took the mirror down and started painting!

The mirror is from Pierre Deux and looked like this before I began.
 

I used one coat of Annie Sloan’s Paris Grey Chalk Paint followed by a glaze and then a top coat of paste wax.


You may also have noticed the wire container went from white to grey – another spur of the moment decision.


I am happy with the results as the mirror no longer looks “newly store bought” but rather more like something you would find in a vintage shop. The funny thing is that Mr. RDH hasn’t noticed yet. Hopefully he will like it as much as I do.

I was curious to know if you have ever done a decorating project on a whim. If so, what did you do and were you happy with the outcome?

On a different note, I am guest posting today at Remodelaholic. I am sharing my how to age brass tutorial.


Blog Widget by LinkWithin