


DISCLAIMER: I am not a painting expert. These are simply the steps I follow when tackling a painting project.

Sand paper and/or sanding block
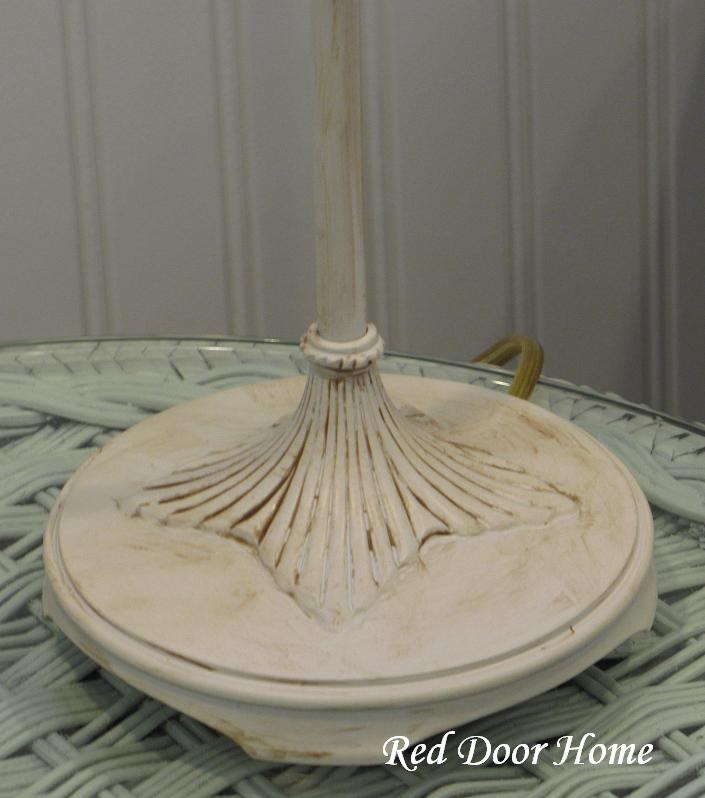
Paint – Valspar Indoor/outdoor satin finish spray paint in Porcelain
Glaze – Ralph Lauren Smoke Aging Technique
Cotton rags
Newspaper/cardboard

Glaze Formula
I purchased a gallon of this glaze from Home Depot over ten years ago and I am still using it today. It is a wonderful color which adds depth and the perfect aged look. I am quite certain it is no longer in the computer system at Home Depot. It can be custom mixed, however, using the formula below.
Ralph Lauren Aging Technique
Smoke (AG03)
RL 2420X Glaze Tint Base (2461)
Colorant OZ 48 96
C Yellow Oxide 0 1 0
L Raw Umber 0 22 1
Location
All of my painting projects are done outside. Living in the northeast is definitely a drawback in this department. I have had to wait – sometimes months - to complete many projects because of the colder temperatures. Not the easiest thing to do when, as Mr. RDH likes to say, I have the patience of a three year old when it comes to projects. (I haven’t always let the weather stop me though. You may remember this photo of some brass lamps I repainted – snow and all!)

Sanding/Cleaning
I give all of my soon to be painted pieces a light sanding (to allow the paint to adhere to the surface better) and thorough cleaning. Depending on the piece, I sometimes clean it first and then sand. Other times I will just go straight to sanding. I tend to use sanding blocks with a fine/medium grit as they are easier to hold and can get into smaller spaces.

After sanding I wipe the piece down as best I can with a dry cotton rag (old t-shirts work great). Many people will tell you to use a tack cloth for this step and this of course is a fine option too. I do my best to remove all the dust but know that if I am going to distress the piece anyway, it really does not have to be absolutely perfect. If I am not going to distress the piece I do try a little harder to make sure all the dust is gone.
Painting
I do not use primer. (Many people will disagree with me here.) For most of the furniture pieces I have painted, I want some of the original wood to show through. I figure if I use primer it is just another layer to sand through.
I place my object on newspaper or cardboard to protect the grass as best I can. I also make sure I am far enough from the house, basketball pole, outdoor furniture, etc. to ensure that if a breeze blows (and it undoubtedly will) nothing else will get painted in the process.

Distressing
I usually wait until the following day to begin distressing – my way of making sure the paint is completely dry. I simply use a sanding block to rub away some of the paint so the original finish can show through. I tend to focus on edges and places that would normally show wear. I think this makes the distressing seem more “real.”
The amount of distressing you do is a personal preference. It is hard to tell someone how much to sand. I would tell you, however, if you are doing a set of something (like chairs) which will all be placed together, try to distress them all about the same.

After I am satisfied with the amount of paint I have removed, I again wipe the piece down as best I can with a cotton rag to remove the dust.
Note: I do not distress everything I paint. Many things (like the brass lamp) have original finishes I do not want to see again. So in these cases, I again wait overnight for the paint to dry and then proceed directly to the glazing step.
Glazing
Applying glaze is another one of those personal preference things. It is up to you to decide how much to apply. I use a cotton rag and simply begin wiping it on and wiping it off until I get the “right look.” I try to make sure the entire surface is covered with the glaze with a few places having a little bit thicker coverage. Again, I tend to go over a piece a few times to make sure I have it covered fairly evenly.
Some people may recommend adding some sort of finishing coat on top of the glaze once it has dried. I have not done this with my painted and glazed pieces.
The End
So there you have it – my painting and glazing process. It really is a quick and simple thing to do and the results speak for themselves.
I hope I have covered everything. If there is something you do not understand or need further details on please let me know. I am always happy to help.
Linking up to my favorite parties HERE


17 comments:
Thank you for the wonderful instructions. I sooooooo needed these instructions. Your pieces look great!
Jeanette
Thank you I know how long this took you to post! I don't use primer either except on brass. Oh, that glazing is tough to get just right! I usually just keep wiping. Thanks for your step by step!
Carol
Thanks for sharing your smarts with us. You have done a wonderful job!
Great instructions! I do it the same way. It's very forgiving!
I am so impressed and learned so
much! Now I know why I just never
got it right! Thank you for taking
the time to post this!
Love everything!
Jane
Flora Doora
Thanks, these are lovely. I must try it sometime.....I am hosting a jewelry giveaway…...would love for you to stop by!!
This is so helpful, thank you so much. I love what you've done with the pieces you've shown us. I will print and keep these instructions.
Karen @ Garden, Home and Party
Thank you for the instructions!!
I'm fairly new to painting and distressing things. But it looks like I'm doing things fairly right. ;)
Love how everything looks; thanks for sharing that with us!
Sue
xo
Great instructions! Thanks for posting the how to.
Jocelyn
http://justalittlesouthernhospitality.blogspot.com/
You did a wonderful job.
I am going to get me some "smoke
glaze!"
Very inspiring!
Great tips! I just glazed something for the first time this weekend, I'm hooked!!!!
Cara
Thank you for sharing your glazing technique. Very helpful! I like those lamps you did!
Hi! I just found your blog from Beyoun My Screendoor and I'm now a follower. Your post today was so helpful to me as I'm new to this...thanks so much!
Rondell
Thank you for the great tutorial. I have painted lots of furniture, but just started using spray paint - and it's so much easier, and sometimes the finish looks nicer. So, I appreciate the tips!!! Your blog, and your home, are gorgeous! LOve EveRThiNg!
Hugs,
Patti
I am a big fan of glazing things as well. I get my tinted black. It adds so much character. Thanks for sharing your secrets!
Great tips!
Post a Comment