Showing posts sorted by date for query stool. Sort by relevance Show all posts

Tuesday, February 8, 2011

Copying Bunny Williams – Well, Sort of

The most recent edition of Veranda includes a half page spotlight of three pieces of Bunny Williams’ second Beeline Home Furniture line of small scale tables and stools.


Although I loved all three featured pieces, it was the simple white painted stool upholstered in muslin called “The Pug Bench” which caught my eye.


I immediately thought of the footstool I purchased a while back for a few dollars at a thrift store.


Now I realize it is a very big stretch to compare the two as mine is a footstool and Bunny’s is a small bench and the lines of the two pieces are not similar at all. However, seeing Bunny’s bench was just the inspiration I needed to transform my formerly very dark footstool into something much more stylish. (I’ll explain the missing nailhead trim below.)


Here is how I accomplished this simple transformation.

Remove needlepoint cover. Lightly sand frame and paint with BM Paper Mache.


Use old cover as a pattern for new cover made of natural color linen.

Attach new cover using staple gun - same process as covering a chair seat.

Attach top to stool base using screws.


Add decorative nailhead trim.

At this point the project took a turn for the worse. I tried to attach the nails with a hammer and they just would not stay – this stool was not made for this type of trim.


Not one to give up I went to plan B – glue.

This did not work either. It looked exactly like what it was – glued on nail heads.


I regrouped, removed the mess-ups and settled on a plain top.


Much better!

Linking up to these wonderful ladies.

Wednesday, September 22, 2010

A Tour of My Family's Home Office

Several months ago, I participated in Remodelaholic's virtual house tour series in which I shared my family's home office.  Since I have not shown this space on Red Door Home before and because many of you might have missed the original guest post, I thought it might be fun to republish one of my favorite and most used spaces in my house
.

Originally my daughter’s nursery, my family's home office is probably the most personal area in our home. It is here we display pictures, artwork, and mementos from vacations. It is also a space which houses several items with sentimental meaning.


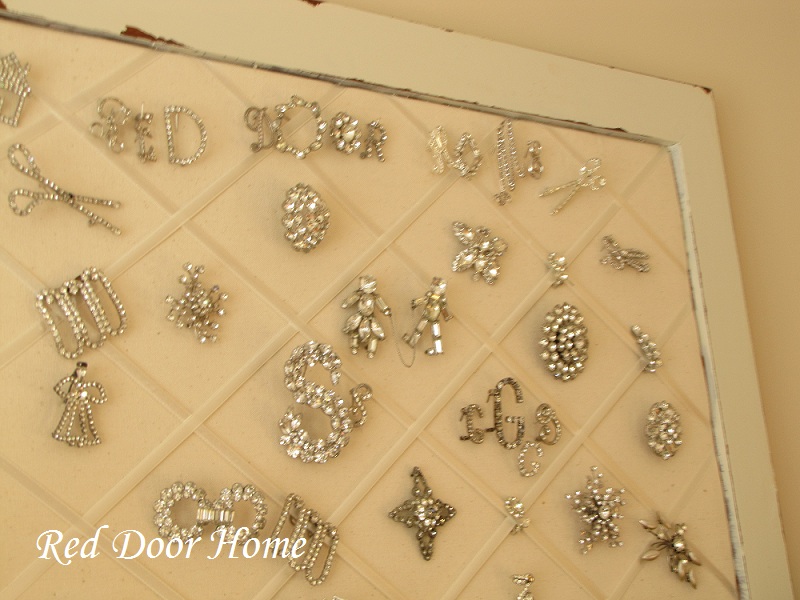
One of my favorite features is the bulletin board showcasing my collection of vintage earrings, pins and shoe clips. My Grandmother loved this type of jewelry and several of the pieces belonged to her. If you look closely at the second picture you can see I collected initial pins spelling “Red Door Home.”


Another favorite feature is the capiz shell light. Purchased on line from Target, it adds an unexpected modern touch to what is a fairly traditional space.


Our family office is a room that has been decorated over time mostly by repainting, reusing and repurposing. The desk is a hand-me-down which I painted and glazed. The chair is a roadside find, which I finished to match the desk. The shelf and bulletin board are new purchases, also painted to look old.


Other painting projects in this room include the lamp (originally brass), the mirror (originally gold leaf), the stool (painted and recovered with vintage feed sack material) and the wainscoting which my husband and I installed. The small trunk is a flea market find and is used for storing papers, magazines, supplies, etc.


Although a majority of the time spent in this room is at the computer, the focal point is the antique Swedish settee. Years ago, I purchased it to go at the end of our bed. After getting it home I realized it was too big and it ended up in the office instead – lucky mistake! Another hand-me-down is the coffee table. It too belonged to my Grandmother. On top of the table sits a child’s chair from a favorite local shop and a pitcher which belonged to a childhood neighbor.


The final piece of furniture in the office is the bookcase. When I purchased it, I was looking for something with display space and filing space. Although it does fit perfectly and is a nice piece of furniture, part of me wishes I had waited to find an older piece.


As you can see, the furnishings and accessories in my family’s office have come from a wide variety of sources. It is a room that has evolved over time and is now filled with many wonderful memories. I guess if you are patient and use what you love somehow everything will work together!

Friday, February 26, 2010

Thanks for the Mention!

This week I feel honored to have been mentioned on two different and equally wonderful blogs.  The first mention came early in the week from Trish at The Old Post Road and featured my recently published pictures in BH&G's 100 Decorating Ideas Under $100(Here) Trish creates beautiful inspirational art on canvas and also has an Etsy shop. I have been a happy follower of The Old Post Road blog for some time now.

The second mention came today from Roeshel at The DIY Showoff where I shared some additional pictures of my Sassy Stool Cover. (Pattern available in my Etsy Shop Here) 

Roeshel's blog is "a collection of creative and inspiring DIY features" and is a must see for anyone who enjoys sharing and seeing an impressive array of DIY projects. I just became a follower, have loved what I have seen so far and am looking forward to seeing more.

Please try to visit each of these women's blogs and leave a comment letting them know you stopped by.

Saturday, February 20, 2010

New Projects in Print

I am so excited to be able to share some recently completed projects. Three different Red Door Home projects have finally made it to print in the Spring 2010 edition of 100 Decorating Ideas Under $100. They include curtains for a budget remake of a beautiful dining room which appeared in Country French magazine, curtain panels and a pillow for a “pink room” and a stool cover made of Amy Butler fabric from my Sassy Stool Topper pattern.


Country french has always been a favorite decorating style for designers and regular homeowners (like me) alike. It is beautiful, comforable and can be achieved over time with a relatively modest budget.  In this feature article, Donna Talley shows how to accomplish this high end look for less.

100 Decorating Ideas Under $100 / Photographer - John Bessler
Stylist - Donna Talley, Regional Editor and Producer for Meredith Publications

The upper right hand inset picture below shows a photo of the inspiration room while the larger picture gives a complete view of the room remake on a budget.

100 Decorating Ideas Under $100 / Photographer - John Bessler
Stylist - Donna Talley, Regional Editor and Producer for Meredith Publications

Donna did such an amazing job including all the little details that make this room so special – decoupage plates, flowers, slip covered chairs, stenciled lamp shades, vintage china, and beautiful fabrics. My contribution to this story was the curtain panels

 100 Decorating Ideas Under $100 / Photographer - John Bessler
Stylist - Donna Talley, Regional Editor and Producer for Meredith Publications

 
100 Decorating Ideas Under $100 / Photographer - John Bessler
Stylist - Donna Talley, Regional Editor and Producer for Meredith Publications

 
100 Decorating Ideas Under $100 / Photographer - John Bessler
Stylist - Donna Talley, Regional Editor and Producer for Meredith Publications


100 Decorating Ideas Under $100 / Photographer - John Bessler
Stylist - Donna Talley, Regional Editor and Producer for Meredith Publications

The original curtains featured a smock pleated header. To achieve the same look for a lot less, I simply used pencil pleating tape on fabric that was purchased from Fabric.com.


Left unlined, the curtain panels were created from one width of fabric with a 1” seam allowance around the entire panel. The pencil pleating tape was sewn about ½ inch from the top and the gathering strings were pulled to the desire window width. To achieve a more gathered look, simply use two widths of fabric.

100 Decorating Ideas Under $100 / Photographer - John Bessler
Stylist - Donna Talley, Regional Editor and Producer for Meredith Publications

The second article, “At First Blush,” shows how pink is no longer just for little girls rooms. There are several pretty pictures including this table runner (above), a built in book case backed with wallpaper and a trio of mirrors on top of a vintage dresser. I had the pleasure of making the table runner, which Donna later embellished, and the simple curtain panels.

100 Decorating Ideas Under $100 / Photographer - John Bessler
Stylist - Donna Talley, Regional Editor and Producer for Meredith Publications

100 Decorating Ideas Under $100 / Photographer - John Bessler
Stylist - Donna Talley, Regional Editor and Producer for Meredith Publications
 
100 Decorating Ideas Under $100 / Photographer - John Bessler
Stylist - Donna Talley, Regional Editor and Producer for Meredith Publications

Again, these curtain panels were made from budget-friendly fabric and left unlined. The panels were cut to length and then finished with a one inch hem on all sides.

100 Decorating Ideas Under $100 / Photographer - John Bessler
Stylist - Donna Talley, Regional Editor and Producer for Meredith Publications

I also created this fringe pillow with a zipper closure (below) from Amy Butler fabric. This pillow adds a feminine feel to the room without being overwhelming.

100 Decorating Ideas Under $100 / Photographer - John Bessler
Stylist - Donna Talley, Regional Editor and Producer for Meredith Publications

The third and final project is a picture featuring my scalloped edged Sassy Stool Topper pattern. This is a great project since it uses only small amounts of fabric and gives any stool a quick remodel.

100 Decorating Ideas Under $100 / Photographer - Michael Partenio
Stylist - Donna Talley, Regional Editor and Producer for Meredith Publications


Wednesday, August 26, 2009

Recover a Vintage Stool

Several years ago I purchased this little vintage foot stool on Ebay. Though I loved the lines, I wasn't too crazy about the brown needlepoint cover. Last month I completed a slip cover project for a client and fell in love with the Zebra fabric she choose. As luck would have it there was a small piece of fabric left over - perfectly sized for my stool.

Recovering this stool was an easy process. Simply take off the stool cover by removing the small tacks with a hammer, pliers and a puddy knife. Use the old cover as a pattern to cut out your new cover. Since I was using upholstery tacks, I made my pattern about a 1/2 inch bigger on all sides than the original. This gave me some fabric to fold under for a nice finished edge.
Center the fabric on the stool. Place one tack in the middle of each side of the stool, folding the fabric under 1/2" and pulling tight. Work from the center out, trying to evenly space the upholstery tacks, until you reach the corners.
Fold the corners neatly and tack in place. You are done!
I love how this new fabric looks. Such a change from the old. If only I was brave enough to tackle the chair I have had for twenty years that needs upholstering!

Wednesday, July 22, 2009

Simple Stool Slip Cover


Here is an easy way to change the look of a simple square upholstered stool. The picture on the top shows the original stool. The picture on the bottom is the slip covered stool in "Zebra" (color - Steel) available at Calico Corners.

The slip covers below are made from a remnant of Italian fabric (top) and a remnant of embroidered linen fabric (bottom) also purchased from Calico Corners.

Requiring only a minimal amount of fabric and simple sewing, this project can be completed in less than 1 1/2 hours. The button-tufted stool is from West Elm and measures approximately 16" square x 18" high but similar inexpensive cube style stools can easily be found at a variety of other places including Target and Marshalls Home Goods.
Directions:
  1. Determine fabric measurements - Measure top and four sides of stool. Add 1 inch to length and width of stool top for seam allowances. Add 1 inch to width of stool sides and 2 1/2 inches to height of stool sides for seam and bottom hem allowances. Cut out all five pieces according to measurements. Note: The slip covers shown were made of home dec fabric and required only 1 yard of fabric. If you plan on matching up patterns or using 44" wide fabric you will require additional yardage. Also, if you plan on washing your slip cover, it is always a good idea to wash your fabric before you cut out your pattern pieces.

  2. Sew sides - Place two side pieces right sides together along "height" sides, making sure both pieces of fabric are going in the same direction. Using 1/2" seam allowance, sew together. Repeat with additional two side pieces. Place these two pieces right sides together along "height" sides. Sew together along both matched edges forming a ring. Using an iron, press seams to one side.

  3. Bottom hem - Using an iron, press bottom edge of ring (slip cover sides)under 2". Fold raw edge under towards pressed seam forming a 1" bottom hem. Sew bottom hem.

  4. Attach sides to top - Turn ring inside out. Mark center point of each side of slip cover top and each side of slip cover side. Placing right sides together and matching raw edges, line up and pin center points of slip cover sides with slip cover top. Pin and sew around entire top using 1/2" seam allowance.

  5. Turn slip cover right side out and place on stool. Enjoy!
Blog Widget by LinkWithin