Showing posts with label Molding. Show all posts

Friday, December 31, 2010

Top Projects and Posts of 2010

Before diving into 2011, I thought it would be fun to take a look back on this past year. It definitely was a busy 365 days filled with numerous projects and house updates. The following are my favorites (in no particular order) from 2010.

Metal Top Table Redo
Using my favorite painting and glazing technique, I transformed a metal top coffee table a friend no longer wanted.

Daughter’s Room Redo
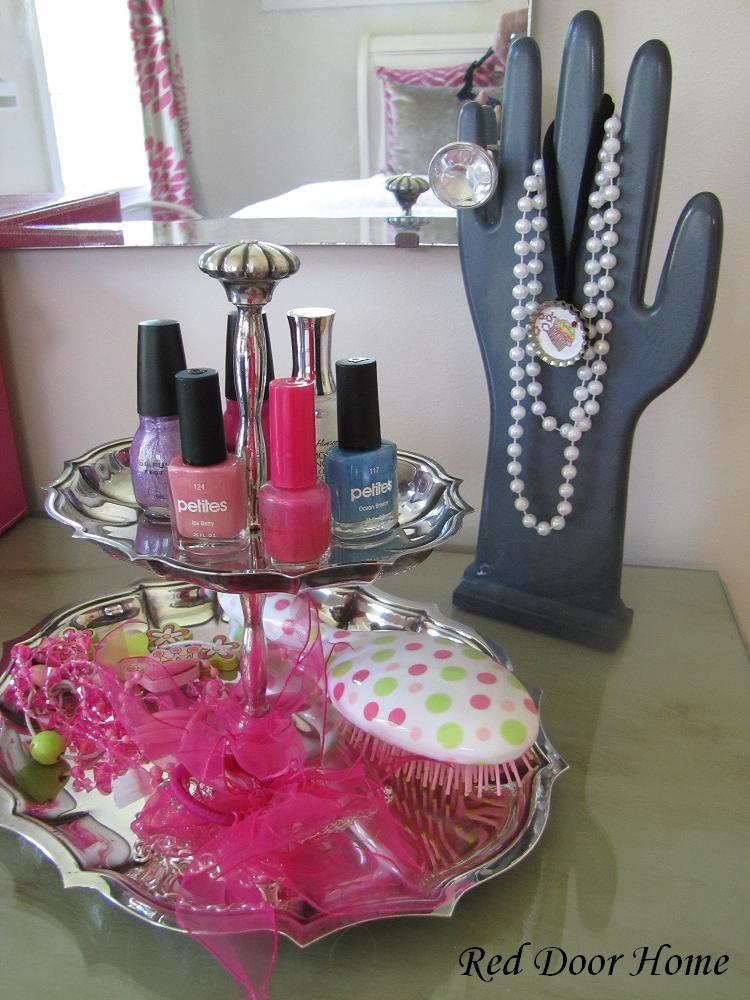
My daughter’s room went from little girl blue and green to big girl pink, tan and gray. Projects included dog silhouettes, embellishing a cork board, creating a marble top side table, and adding ceiling molding.


Dining Room
Paint changed a mismatched group of furnishings – a floor sample clock, thrift store chairs and buffet, and a Craig’s list table – into a cohesive grouping. With the addition of a zig zag rug, Ikat fabric to cover the chairs and a mirror (which has yet to arrive) this space started the year almost empty and finished almost full.


Bye Bye Red Room
We lightened up our red living room by painting it white, removing accessories and adding new curtains. This space is still a work in progress and is on my “to do” list for 2011.


Secrets to Finding Roadside Treasures
Here I shared the three reasons I have been so successful in finding roadside freebies.


Block Printed Pillows
Vintage printing blocks and letters were used to create unique patterns on fabric which were then turned into pillows.


One Dollar Decorating
I found a mismatched group of milk glass vases at the thrift store and created a pretty table and mantle for only one dollar.


My Sewing Machine
The only sewing machine I have ever owned belonged to my Grandmother - proving it does not take a fancy sewing machine to sew!


Worth the Wait
This post highlighted the landscaping transformation our house has gone through since moving in nine years ago. We began with nothing but dirt and have slowly created a yard we are proud to call our own.

So there you have it – the best of Red Door Home 2010. Hope you enjoyed the past year as much as I have. I am looking forward to 2011 and all the great projects and posts the year brings.

I would love to know your favorite post of 2010? What would you like to see more of in 2011?

Saturday, May 15, 2010

Final Bedroom Reveal

For the past few weeks I have been showing various parts of my daughter’s bedroom makeover. I so appreciate everyone who has followed along and shared such encouraging comments. Thank you! So, without further delay, here is the room in its entirety.
Where we began
As I have mentioned before, my daughter’s room was decorated around a blue and green Laura Ashley bedding set I used when I was in college.
I made the curtains from an extra set of sheets. The dressing table was a roadside find which I panted and stenciled. You can tell from the before photos, I was very much into everything matching perfectly. I have since come to realize by mixing things up a bit, a room becomes more interesting.
Putting it all together
Although my daughter has not reached double digits, she wanted a room where she could make some of the decorating choices. We were not initially on the same page, but through compromise – she wanted pink and dogs and I wanted a space that would fit in with the rest of the house and one she would not out grow in a few years - we were able to create a room we both love. The starting point for the entire project was the curtain fabric.
I have to admit it was a real struggle to find coordinating fabric to use for the Euro shams. After many hours online, I finally found the pink zebra fabric. (I apologize for not remembering the source.) The regular shams are made from left over fabric from another project and the long pillow with the flowers I made from inexpensive suiting material.
The bedside table is topped with a piece of marble I purchased at an antiques store. I love how the gray veining picks up the other gray features in the room and adds another layer of texture to the space. (To see the story behind the marble click here.) The lamp is one of a pair which I painted and glazed.
For artwork, I created inexpensive dog silhouettes, . . .
. . . updated a bulletin board with ribbon . . .
. . . and added a simple frame around the chandelier.
The dressing table was updated with a fresh coat of paint . . .
. . . and accessorized with vintage and yard sale finds.

Unplanned Changes
One of the biggest changes in this room was the flooring. You may have noticed from the before picture, the bedroom was carpeted. Installing hardwood floors was not in the original redo plan. In fact, the room was basically finished when we decided to replace the carpeting. We were at the point where something had to be done - markers, nail polish and lotion just do not work well with white carpet.
Replacing the carpeting with wood floors meant purchasing a rug. After what seemed like endless searching for the right color and size, I finally splurged on the pink and white rug you see above – the finishing touch to the room.

So there you have it – my daughter’s room redo! It is hard to believe the entire process started over 8 months ago. Overall, I think we achieved the goals of this project. I am very pleased with the results and most importantly, so is my daughter.

Sources:Bed – Ethan Allen
Dresser – Ethan Allen
Rug – Madeline Weinrib
Dresser lamp – vintage yard sale find
Bedside lamp – repainted brass lamp
Curtain fabric – Calico Corners
Pillow fabric (gray and pink) – JoAnn Fabrics
Pillow fabric (tan velvet) – Calico Corners
White faux fur throw – Home Goods
Sunburst mirror – Wisteria
Upholstered cubes – Target
Upholstered cube slipcover fabric – fabric JoAnn Fabrics
Bulletin Board – Ballard Design
Small Shelf below bulletin board - Target

Linking up to some of my favorite parties.

Thursday, April 22, 2010

Two Simple Ideas to Add Character to Your Ceilings

One of the most under decorated spaces in houses tends to be the ceiling. Unless you live in an older home blessed with beams, tin and/or ornate moldings, it is rare to see anything today beyond white paint and crown molding.

Being a “detail person,” I am always looking for simple and inexpensive ways to add character to my house. I find it is the little things that turn the ordinary into the extraordinary. So I wanted to share two ideas – three projects – that we did in our house to add charm to our ceilings.

#1 PAINT
Bathroom Ceiling
One of the unique things we did in our house is paint the master bathroom ceiling blue.
When we moved into our house, the bedding colors in our master bedroom were white, yellow, and blue. In an effort to make the two spaces – bedroom and bathroom - coordinate we decided to add a touch of blue to the bathroom.
Instead of adding the color to the walls, we painted the ceiling. I love how this keeps the room light and bright but still adds the color we wanted. Although we have recently changed our bedding colors to a more neutral palette, the blue ceiling still remains.


#2 MOLDING
Foyer ceiling
The foyer in my house is fairly small - big enough for a 4’ x 6’ rug but too small for any type of furnishings. To help delineate this space from the hallway and create a sense of separation, we framed our light fixture with simple stock molding and wooden embellishments.
My husband cut four 4’ boards for the outside molding and four 3’ boards for the inside molding to create two frames. After nailing the boards and rosettes in place, the nail holes were filled and the space between the boards was painted the same white semi gloss as the trim. The trickiest part of this project is getting the boards straight and centered exactly even around the light fixture.
I love how this small touch of molding gives the foyer a sense of distinction from the hallway and sets the tone for the rest of the house.

Bedroom ceiling
Because I loved how the foyer ceiling turned out, I convinced my husband to do something very similar in my daughter’s bedroom. She has a pretty crystal chandelier (before shown below) but I wanted to make it stand out even more.
This time we used two different types of molding – a larger width piece for the outside frame and a smaller width piece for the inside.
The process was the same as in the foyer – cut the wood, nail in place, fill holes and paint. Below is the molding in place but unpainted.
Here is it is all finished. You will notice this time we decided to leave the space between the frames blank - no rosettes.


I am very pleased with how all three of these projects turned out. I am hoping our next attempt at embellishing a ceiling will be in the dining room. I am trying to convince my husband we need (and can make) a coffered ceiling! Wish me luck.

Linking up to these parties
Blog Widget by LinkWithin