Monday, March 29, 2010

Worth the Wait

When my husband and I built our house 8 1/2 years ago we made the choice to spend our money on permanent features and eliminate virtually anything that could be added later. This meant no kitchen island or butler’s pantry, no air conditioning (for two years), crown molding, bead board or wainscoting, no driveway, landscaping, patios or sidewalk, no built-in cabinets, finished basement or gardens. The outside of our house looked like this the day we moved in - not a blade of grass, bush or tree, and no hardscaping to be found.

I mentioned in an earlier post that my husband is quite handy and talented when it comes to projects around the house. I wanted to share a few of the many incredible outdoor things he has accomplished.

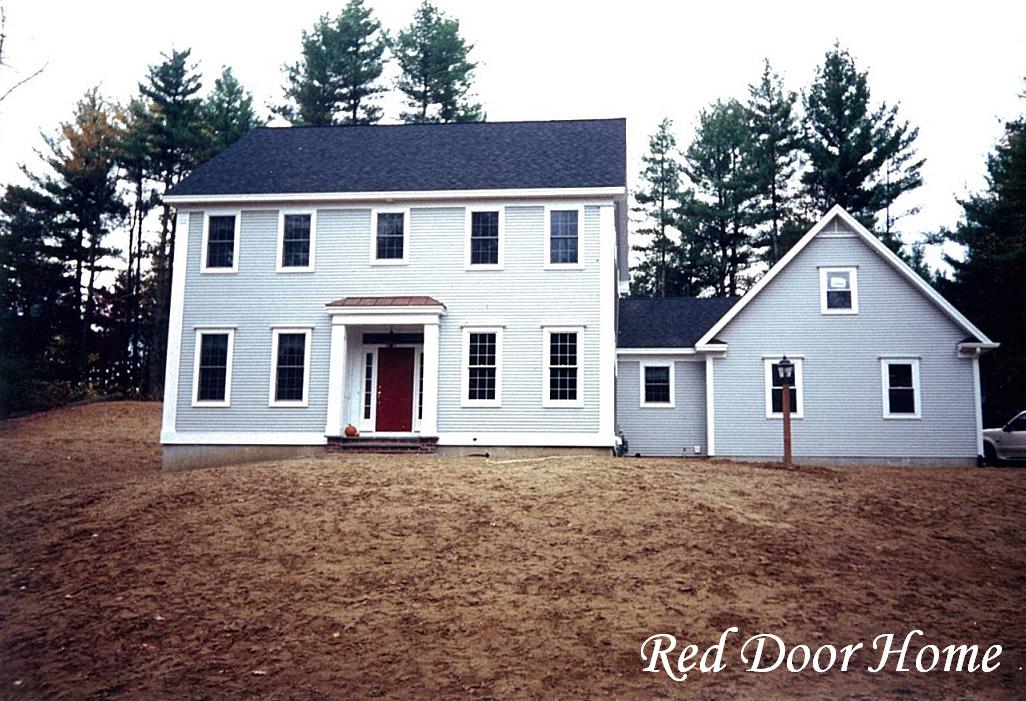
Retaining walls were the first project on the list as they were necessary to hold back the hill behind the house as well as the dirt around the side of the house. The first picture below shows where we started. My husband had help on the first wall from his Dad but after that he was pretty much on his own. I helped out by carrying rocks but everything else he did.


This is what the side of the house looks like today.


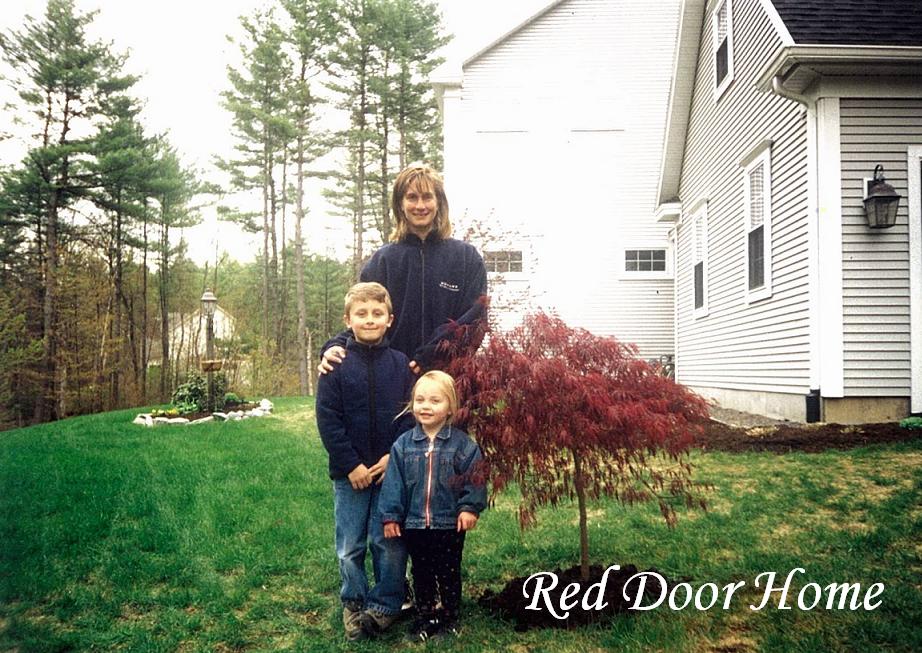
Next came the sidewalk and front retaining walls. We lived for five years (yes, five!) with just a dirt path to the front door.  Below is a picture from Mother's Day 2005.  You can see we still do not have a sidewalk or retaining walls around the front light post (which also has been changed).  We have just finished planting my present - a red maple tree.


Here is a view of the front today - lots of landscaping and a sidewalk.  My husband lined the bluestone sidewalk with Belgian blocks to keep the bluestone from moving over time. We also designed and planted everything you see.


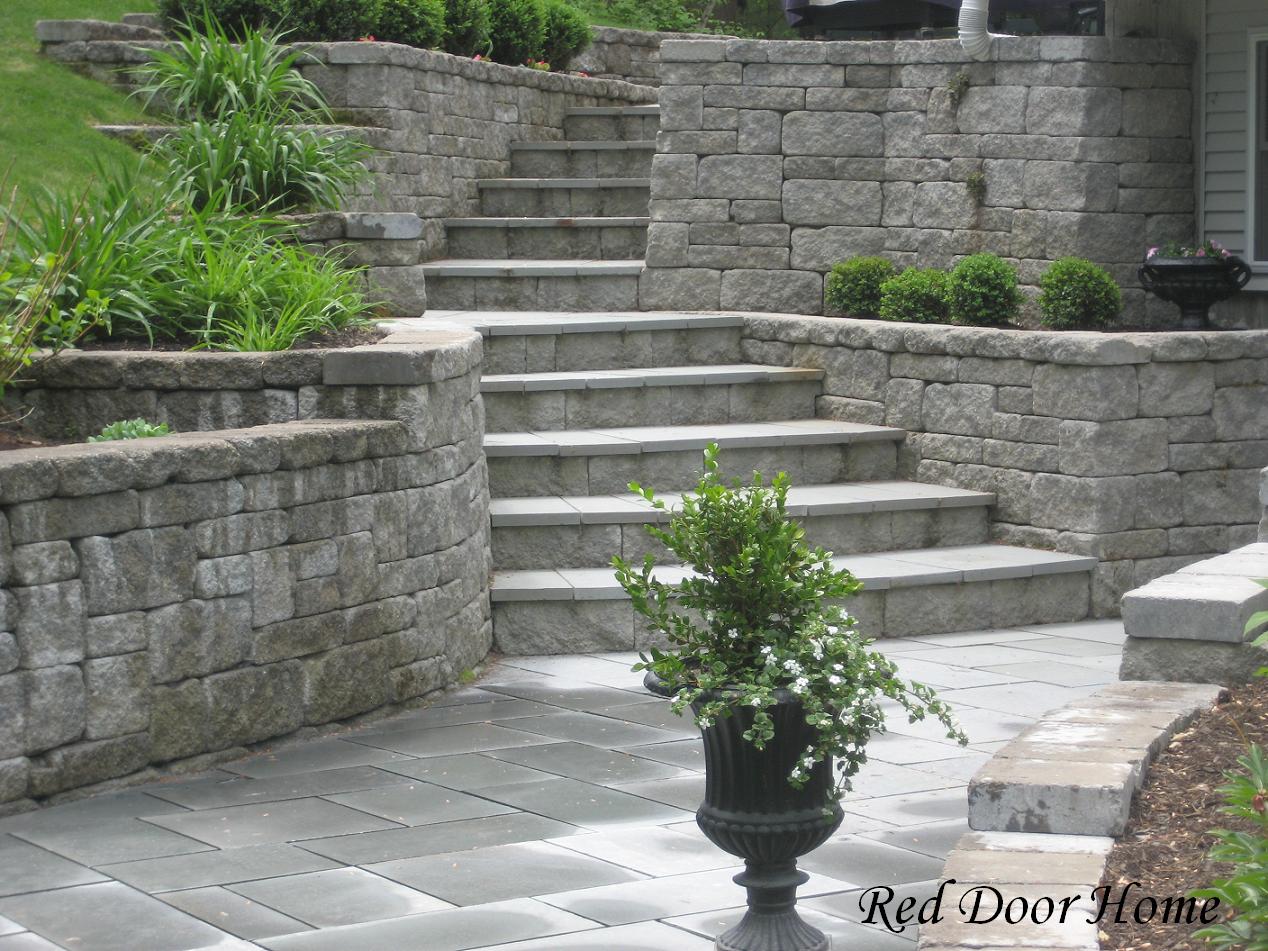
The upper patio and steps were then added. Unfortunately, I do not have a before picture of this view.  It is enough to say, however, that all that was here was dirt.


Finally, the patio behind the walkout basement was completed.


It has taken 8 years of hard work to get to this point. Since we do not own a tractor, my husband and I used only a wheelbarrow, shovel, level, and circular saw. We bought materials as we could afford them, one load of rocks and bluestone at a time. When it came time to build the sidewalk and patios, we wanted only “blue” bluestone. Each time our local supplier received a new shipment, my husband and I went and chose each piece for our projects by hand.


The overall landscaping has also been an ongoing process.  We planted grass seed in stages and then developed the flower beds and other gardens. My husband and I dug up the oak trees that line our driveway (You can see the branch of one of the trees in the picture above of what our house looks like today) from the woods behind our house. Most of the trees and shrubs are Mother’s Day presents. Instead of going out to dinner or buying a present, every year we have lived in this house I have received a new addition to our landscaping.

I obviously am proud of what we have accomplished. It has taken years of hard work to get to this point and it has definitely been worth the wait.

U Create Guest Blogger

I am so thrilled to be a guest blogger today at U Create
I am sharing an updated version of my vintage block printing projects tutorial. 

Kari's blog is filled with a wonderful variety of creative projects.  I hope you will stop by for a visit!

Also today - head over to Holiday with Matthew Mead to find out how you can win the opportunity to have your blog or online shop mentioned in the magazine. Holiday with Matthew Mead is a "book-azine" celebrating and offering inspiration for the Christmas holiday season. To be released in October 2010, Holiday is offered via online orders only - in limited quantities - and will not be sold on newsstands. But, by simply following the BUY HOLIDAY MAGAZINE link below their banner, you can reserve your own copy of this beautiful magazine, with guaranteed delivery of the magazine straight to your mailbox! Holiday with Matthew Mead is144 pages of holiday inspiration with well-known and admired designers, bloggers and top-notch features, printed on beautiful paper and not drowning in ads!

Now, head on over for your chance to win!

Tuesday, March 23, 2010

Pretty Pinwheels

Here is a simple and fun take on a summer time childhood favorite - pinwheels! Traditionally, pinwheels are made of paper. I decided to try a new spin and make them from fabric instead.

What I used:
Linen fabric
Heat n Bond Lite
¼” x 12” long wooden dowels
Decorative button – approximately 1” in diameter
18 gauge wire
¼” grommet
Scissors
Power drill
3/32 drill bit
Pencil
Iron
Small bead
Pinwheel pattern (below)
Hammer
Pliers
Wire cutters

Pinwheel Pattern:
Note: Enlarge to 6" x 6" square.

What I did:
Makes one pinwheel. Please read through all instructions before beginning.
Cut four 6” square fabric pieces and two 6” square pieces of Heat n Bond Lite. Using an iron and the Heat n Bond, follow manufacturer’s instructions to fuse two pieces of fabric together - right sides out. You now have the two fabric squares which will form the pinwheel.
Pin pinwheel pattern to both completed fabric squares. Cut along dotted lines to center circle as indicated. Mark center of square with pencil.
Using pattern as a guide, take one corner indicated with a dot and fold it towards the center of the square. Secure with needle and thread and cut off end of end triangle so center mark is visible. (I used the same needle and thread to secure all four folds.)
Fold over next marked corner. Once again, secure with needle and thread and cut off end of triangle so center is visible. Continue in this manner until all four marked corners have been sewn in place. Repeat with second fabric square.
Using small scissors make a hole in the center of both squares where marked.
Insert grommet through both center holes – right side up. Align two pinwheels as shown below. 
Following manufacturer’s instructions secure pinwheels together with grommet.

Cut a 6” piece of wire using wire cutters. Thread through button hole, fold in half, and twist slightly. Using pliers, squeeze wire tight around button hole so that the button will not move.
Using power drill and 3/32 drill bit, drill a hole in the dowel approximately ½” from the end of the dowel.
Insert wire with button through pinwheel. Thread small bead on to wire.
Thread wire through hole in dowel. Leaving about ¼” space between bead and dowel, wrap wire around dowel. Use pliers to press ends of wire tightly next to dowel.


How to Enjoy:


What I learned:
Pinwheels are very simple to make and the fabric combinations are endless. They make unique table top decorations, party favors and more! This is a great project to use up small pieces of fabric and would also be easy to follow using paper.

Transformation Thursday at The Shabby Chic Cottage
Strut Your Stuff at Somewhat Simple
Show Off Your Stuff at Fireflies and Jelly Beans
Weekend Wrap Up Party at Tater Tots and Jello
I Made It Party at Everything Etsy

Saturday, March 20, 2010

A Simple Mudroom

We are all so used to seeing incredible before and after pictures, I think sometimes we lose sight of the fact that for most of us simple solutions are the norm. Most people can not afford to completely redo a room from top to bottom like we see in so many magazines. We can, however, make small changes which lead to big improvements in how our own family functions from day to day. Designer Elizabeth Tanny of etanny design recently completed just such a project - a simple mudroom makeover.


Her client’s house lacked an organized space for coats, back packs, gloves and hats, mail, etc. Elizabeth’s goal for this project was to meet the functional needs of the family while introducing a stylish entrance to the house for their family and friends.

To complete this project, the laundry room was moved downstairs to the basement, freeing up the 8’ x 8’ space for a mudroom. Since the door leading into the room was always open, it was removed. The family also wanted to continue to have their much used utility sink. Elizabeth’s stylish solution to this request was a stainless steel utility sink found at a restaurant supply store. For organization, a locker system in a warm espresso finish was installed. To finish the simple look, a brushed nickel mirror and pendant light fixture were added.

To see additional posts on this blog featuring Elizabeth’s work click here and here. To visit etanny design click here.

Metamorphasis Monday
Its so very renovated at Its so very Cheri
Tip me Tueday at Tip Junkie
Blog Widget by LinkWithin